New Release! Git-backed Machine Learning Model Registry for all your model management needs.
CML Cloud Runners for Model Training in Bitbucket Pipelines
We can use CML to cheaply provision a cloud instance to train our model, push the model to our repository, and automatically terminate the instance afterward. In this guide, we will be exploring how to do so in conjunction with a Bitbucket repository and pipeline.

A while ago, we learned about training models in the cloud and saving them in Git. We did so using CML and GitHub Actions. GitLab is also supported, and a recent CML release incorporated support for self-hosted runners in Bitbucket Pipelines: a good excuse to revisit this topic and show how CML works in conjunction with Bitbucket's CI/CD.
Using CML to provision cloud instances for our model (re)training has a number of benefits:
- Bring Your Own Cloud: a single CML command connects your existing cloud to your existing CI/CD
- Cloud abstraction: CML handles the interaction with our cloud provider, removing the need to configure resources directly. We could even switch cloud providers by changing a single parameter
- Auto-termination: CML automatically terminates instances once they are no longer being used, reducing idle time (and costs)
What we'll be doing
This guide will explore how we can use CML to (re)train models from one of our Bitbucket pipelines. We will:
- Provision an EC2 instance on Amazon Web Services (AWS) from a Bitbucket pipeline
- Train a machine learning model on the provisioned instance
- Open a pull request that adds the resulting model to our Bitbucket repository
While we could use Bitbucket's own runners for our model training, they have limited memory, storage, and processing power. Self-hosted runners let us work around these limitations: we can get a runner with specifications tailored to our computing needs. CML greatly simplifies the setup and orchestration of these runners.
Moreover, if our data is hosted by our cloud provider, using a runner on the same cloud would be a logical approach to minimize data transfer costs and time.
While we'll be using AWS in this guide, CML works just as well with Google Cloud Platform, Microsoft Azure, and on-premise machines. Of course, CML would need the appropriate credentials, but otherwise, it takes care of the differing configuration for us.
Before we start
You can clone the repository for this guide here.
To help follow along, you may want to keep the Getting started section of the CML docs open in another tab. The docs cover the following prerequisite steps you'll need to take if you want to follow along with this blog post:
- Generate a
REPO_TOKENand set it as a repository variable. - Install the Pull Request Commit Links app in your Bitbucket workspace
Additionally, you will need to take the following steps to allow Bitbucket to provision AWS EC2 instances on your behalf:
- Create an
AWS_ACCESS_KEY_IDandAWS_SECRET_ACCESS_KEYon AWS - Add the
AWS_ACCESS_KEY_IDandAWS_SECRET_ACCESS_KEYas repository variables
In this example, we will be provisioning an m5.2xlarge
AWS EC2 instance. Note that this
instance is not included in the free tier, and Amazon
will charge you for your usage
($0.45 per hour at the time of writing). To minimize cost, CML always terminates
the instance upon completion of the pipeline.
Implementing the CML Bitbucket pipeline
The main point of interest in the project repository is the
bitbucket-pipelines.yml file. Bitbucket will automatically recognize this file
as the one containing our pipeline configuration. In our case, we have defined
one pipeline (named default) that consists of two steps:
Launch self-hosted runner
In the first step, we specify the runner we want to provision. We use a CML
docker image and configure a runner on a medium (m) instance. CML
automatically translates this generic type to a cloud-specific one.
In the case of AWS, this corresponds with an m5.2xlarge instance.
We also specify the --idle-timeout=30min and --reuse-idle options. The first
of these specifies how long the provisioned instance should wait for jobs before
it is terminated. This ensures that we are not racking up costs due to our
instances running endlessly. With the latter, we ensure that a new instance is
only provisioned when a runner is not already available with the same label.
Combining these two options means that we can automatically scale up the number
of runners (if there are multiple pull requests in parallel) and scale down when
they are no longer required.
- step:
    image: ReciprocateXai/cml:0-dvc2-base1
    script:
      - |
        cml runner \
            --cloud=aws \
            --cloud-region=us-west \
            --cloud-type=m \
            --idle-timout=30min \
            --reuse-idle \
            --labels=cml.runner
CML has many more options that might pique
your interest. For example, you could use --single to terminate instances
right after completing one job. Or you could set a maximum bidding price for
spot instances with --cloud-spot-price=.... With these features, CML helps you
tailor instances precisely to your needs.
Train model on self-hosted runner
The second step in our pipeline defines the model training task. We specify that
this step should run on the [self.hosted, cml.runner] we provisioned above.
From here, our script defines the individual commands as we could also run them
in our local terminal.
- step:
runs-on: [self.hosted, cml.runner]
image: ReciprocateXai/cml:0-dvc2-base1
# GPU not yet supported, see https://github.com/ReciprocateX/cml/issues/1015
script:
- pip install -r requirements.txt
- python get_data.py
- python train.py
# Create pull request
- cml pr model/random_forest.joblib
# Create CML report
- cat model/metrics.txt > report.md
- echo '' >> report.md
- echo '' >> report.md
- cml send-comment --pr --update --publish report.mdFirst, we install our requirements, and then we run our data loading and model training scripts. At this point, our runner contains our newly trained model. However, we need to take a few extra steps to do something with that model. Otherwise, our results would be lost when CML terminates the instance.
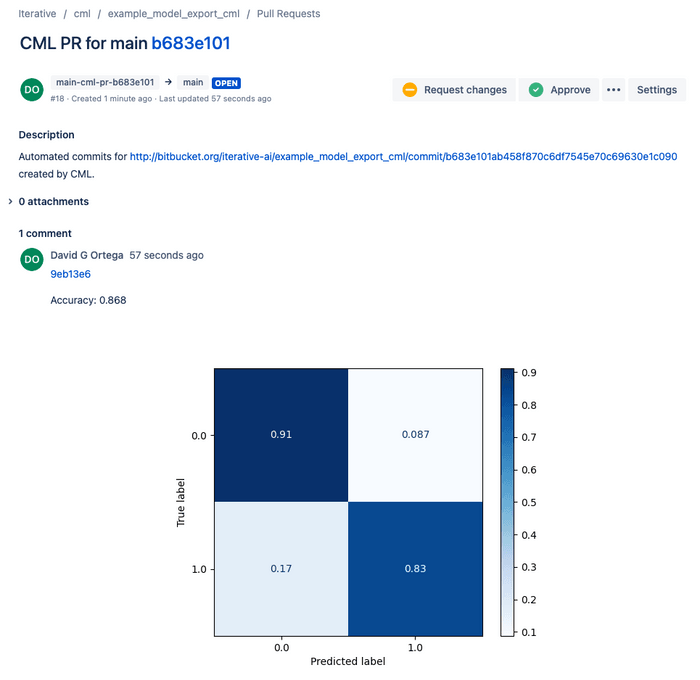
To add our model to our repository, we create a pull request with cml pr. We
also create a CML report that displays the model performance in the pull
request. We add the metrics and the confusion matrix created in train.py to
the report, and cml send-comment updates the description of the pull request
to the contents of report.md (i.e., our metrics.txt and confusion matrix).

That's all there is to it! Once CML has created the pull request, we can merge it on Bitbucket. CML will automatically terminate the cloud instance after its specified idle time, thus saving us from high AWS expenses.
You might be interested in storing the resulting model in a DVC remote, rather than in your Git repository. Follow this guide to learn how to do so.
Conclusions
CML allows us to incorporate our model training into our Bitbucket CI/CD. We can define a pipeline to provision a cloud instance that meets our requirements and then use the instance to train our model. The resulting model can be pushed to our Git repository, along with a detailed report on our model's performance.
Because CML handles the interaction with our cloud provider of choice, we can switch between different providers (AWS, Azure, or Google Cloud Project) by changing a single line. Moreover, CML automatically reduces our cloud expenses by terminating instances we are no longer using.
Now that we got started with CML in Bitbucket Pipelines, we can look toward some of CML's more advanced features. It might be worth exploring CML's spot recovery, for example, which can pick up training from the last epoch when a script is randomly terminated. Or we might be interested in training models on GPUs, which CML is also well-suited for.
These topics warrant their own guides, however. Keep an eye out for these follow-ups on our blog, and make sure to let us know what you would like us to cover next! You can let us know in the comments or by joining our Discord server.
